Elec Sys What's draining my battery?

Border Collie Dad

Flat Earther
I have a '53 Cub and '53 Super H (both 6 volt, pos ground, with generators) , and have been through similar issues. 6.31 volts is a good reading for a battery at rest. You should see around 6.7 volts at the battery with the engine running and a good charging system. The ammeter (the only gage on the Cub dashboard) should move left of center when you turn on the ignition (prior to engine start). After engine start the ammeter should move to the right side of center, settling to just right of center once the engine has been running for a few minutes.

I had a bear of a time getting my charging systems to work properly. Turns out the cheap voltage regulators I bought at Tractor Supply, CaseIH dealer, auto part store were junk. I ended up going to Brillman.com for USA-made units at 2-3 times the price. But they work.
Not sure my ammeter is working, Luke.
Thanks for the good info.
I'm going to see if I can learn how to test this stuff.
Not terribly clever in figuring this stuff out
 

Luke

Silent Grey Fellow
farmallcub.com has been a valuable resource for me when I was diagnosing the various electrical issues on both of mine. This thread, while a bit more detailed than I needed, may be helpful:


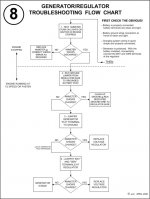
I also used this flowchart:
Regulator troubleshooting chart.jpg

I have a wiring diagram for Cubs with a distributor ignition (not magneto). A single page and simple to read, it will tell you how to verify your ammeter is wired properly. If you want this, let me know and I'll scan it in.
 

Switchback

Veteran Member
I have a '51 Cub.
Identify weather you have a 2 or 3 brush generator.
Somewhere through the years there could have been a mismatch of replacement parts.
For example a three brush gen matched to a regulator used with a 2 brush gen.
Or a regulator used where a cutout relay should be used. It could be "Frankensteined".

Do a good visual inspection of the wire harness, especially behind the instrument area.
Look for frayed wires at the terminal ends.
Also those generators won't charge at idle. It's got to be throttle up to charge efficiently. Idle speed and the governor must be adjusted properly as well. (easy)
I'm quite certain the 49 will use a cutout relay, not a voltage regulator.
Or maybe someone along the line replaced the light switch with an incorrect one.

*Check the fan drive belt and make sure it is tight. It has to be since it drives the pulley that drives the generator belt. Belts have to be tight to charge properly. They can't be worn down either or the incorrect size. The top of the belt should be even with the top of the pulley grooves, more or less.

*The grounds are VERY important. Clean where the pos cable connects to the chassis. The generator ground must be good. It grounds through the gen frame and mounting brackets. Mounting bracket to engine block must be clean.

Clean all electrical connections especially the generator terminal stud eyelets, ammeter connections, light switch wire connections, etc.

You can remove the hood/tank assembly to get better access to everything.
I use a modified gas can to set on top of the engine to feed the carb with fuel while the tank is off for engine work. It's so much easier!
You really have to remove the hood to adjust the belts and look things over and to clean Generator grounds. Generator bearings need to be oiled.

You can also remove the generator, take off the back cover and check the brushes. They might be worn down and not make optimum contact to the commutator. Learn how to check the field windings and armature. The generators can be rebuilt. It's important to know the model number. It can be found on the data tag on the housing.
 

Border Collie Dad

Flat Earther
Luke, Farmall.com was and has been a lifesaver for me over the years.
And I'm asking the same question over there.
I can't seem to download the charts from there at a normal size and when I print they print in unreadable pale blue ink.
If you would scan the charts, I'd appreciate it.

Bones, I've seen her videos and will check this one out.
BTW, I have her book.

Switchback, not sure whether I have a 2 or 3 brush generator and don't know how to check.

I don't think it's a charging problem but something is drawing power when it's not running.
Since I realized I have a problem I had been starting every couple days and letting it run.
The last time it was only a few days and it was dead.

I could, also, have a charging problem and will check that out.
I need to find the power draw
 

Luke

Silent Grey Fellow
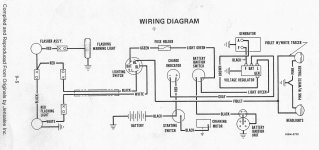
Border Collie Dad, Here is the wiring diagram from the shop manual (a reproduction purchased from Steiner Tractor, a great outfit). You may consider disconnecting any wires going to the lights, since they are not essential and may be the source of the drain. Don't get hung up on the wire coloring; who knows what's been done to your Cub since it was new.Cub wiring diagram 2.jpg
 

Attachments

  • Cub wiring diagram 2.jpg
    Cub wiring diagram 2.jpg
    184.5 KB · Views: 1

Border Collie Dad

Flat Earther
After several days with the positive battery terminal disconnected, that the tractor started easily after re-connecting.
The ammeter showed charging and the battery was still at 6.37 volts.
I did notice the ground cable was loose where it connected to the battery box and tightened it.
Could that have caused my voltage draw?

To hunt for the draw, with the ignition button off, would I go to the next connection and see if there is any voltage?
For example, the starter is next.
Then the regulator, then generator, etc.?

Edited to add:
Disconnected ground cable from positive battery terminal and measured 15 milliamps.
 
Last edited:

raven

TB Fanatic
After several days with the positive battery terminal disconnected, that the tractor started easily after re-connecting.
The ammeter showed charging and the battery was still at 6.37 volts.
I did notice the ground cable was loose where it connected to the battery box and tightened it.
Could that have caused my voltage draw?

To hunt for the draw, with the ignition button off, would I go to the next connection and see if there is any voltage?
For example, the starter is next.
Then the regulator, then generator, etc.?

Edited to add:
Disconnected ground cable from positive battery terminal and measured 15 milliamps.

A blade disconnect switch will save wear on connecting and disconnecting the battery terminal. The clamp end connects to the battery post and the post end connects to your cable.
When you run the tractor, close the switch.
When you are done, you open the switch.
Not high tech. If you can attach a battery cable, you can attach one of these.
We had a blade disconnect switch on the Massey Ferguson like this but it was a 12 volt positive ground "top post".
View attachment 426763
Clamp on the left attaches to battery.
Post on the right attaches to tractor cable.
$15.00
Ask at tractor supply for one for your battery.
 

raven

TB Fanatic
I'd prefer not to put a bandaid on.
Besides, I'd like to learn something.
I like the way you think. I totally agree.
And . . . I would still get a blade disconnect switch because:
a. It eliminates the wear and tear on the cables from removing and attaching
b. When I get tuckered out from testing, I flip the switch and take a break knowing I do not have to set up the charger again.
c. Prevents (although it isn't going to stop a smart thief) someone from driving off with the tractor because when that blade switch is open, it ain't gonna start.

Probably would not hitch up the team and load up the Conestoga Wagon to make a special trip into the general store for it.
 

Millwright

Knuckle Dragger
_______________
To hunt for the draw, with the ignition button off, would I go to the next connection and see if there is any voltage?
For example, the starter is next.
Then the regulator, then generator, etc.?

Yes

Leave the meter connected between ground clamp and ground terminal on battery.

Disconnect things one at a time and see if that 15 mA changes.
 

Border Collie Dad

Flat Earther
a. It eliminates the wear and tear on the cables from removing and attaching
b. When I get tuckered out from testing, I flip the switch and take a break knowing I do not have to set up the charger again.
Hopefully, I find and fix the problem so I don't have to do a.
I agree that it's a pain in the a.. butt hauling the charger out.
Leave the meter connected between ground clamp and ground terminal on battery.

Disconnect things one at a time and see if that 15 mA changes.

Thanks, Millwright.
I kind of thought so
 

subnet

Boot
Thanks, Raven and Subnet.

I'd rather find the voltage draw.
The trickle charge/desulfator portion is a need especially if the vehicle sits for any amount of time not running.
The lead begins to sulfate in a battery very quickly and leads to internal shorts ect keeping it fully charged and desulfated prolongs the life of the battery whether there is a small draw or not.
I.e....it saves you money
 
Last edited:

Border Collie Dad

Flat Earther
A neighbor's son who works for a real good auto electric shop stopped by to fix my riding mower.
I asked him to look at my tractor.
After checking a few things, he pulled the fuse and the voltage draw went away.
Everything works with the fuse removed so I'm leaving it out.

I would like to find the problem so I'm not doing a workaround.
 

subnet

Boot
A neighbor's son who works for a real good auto electric shop stopped by to fix my riding mower.
I asked him to look at my tractor.
After checking a few things, he pulled the fuse and the voltage draw went away.
Everything works with the fuse removed so I'm leaving it out.

I would like to find the problem so I'm not doing a workaround.
If everything works now...what was the fuse for?
 

raven

TB Fanatic
A neighbor's son who works for a real good auto electric shop stopped by to fix my riding mower.
I asked him to look at my tractor.
After checking a few things, he pulled the fuse and the voltage draw went away.
Everything works with the fuse removed so I'm leaving it out.

I would like to find the problem so I'm not doing a workaround.
Pretty good resolution . . .
But you said,
I'd prefer not to put a bandaid on.
Now, I can't hold you to it but . . .
There is a link to the original owners manual upthread,
and you have several wiring schematics,
and you are a member of the FARMALL forum . . .

at the very least, you can take a picture of the component the fuse came from and post your story on the forum which will do two things.
a. If someone can tell you what that component is It will tell you "exactly" where the "problem" lies.
b. It will make you not just another forum taker of knowledge but a genuine forum "giver" to the Farmall Knowledge base (there is probably another clone on YOU out there that is having the same problem).

But no pressure . . . LOL
 

raven

TB Fanatic
Half step ahead of you, Raven.
Here's a link to the thread over there.

I love that forum.
They saved my bacon so many times over the last 10+ years.

This was my dad's Cub and I bet it hadn't run in 20 years.
That forum got me going and one of the members even came to my house to help me.
Now that is so cool.

I bet it would make a great story . . . I would read it.
 

Border Collie Dad

Flat Earther
Here's what Jim Becker said at the Farmall Cub forum.
I think in this case you are narrowing in on a light switch that is internally in bad shape. You could be leaking power through corrosion inside the switch from the input lug to the switch housing (which is grounded). You might try this test:
1 Stick the fuse back in.
2 Verify the leak is back.
3 Physically remove the switch from the tank support, leaving the wires attached and positioning the switch out of contact from anything except the wires. (remove screw from knob, remove knob, remove hex nut and star washer)
4 See if the leak goes away.
If the leak goes away, your problem is inside the switch. Some people have managed to take those switches apart and clean them up. I'm not going to advise down that path.
 
Top