Raised Bed How To Hügelkultur and Reduce Water Needs.

China Connection

TB Fanatic
I just thought that I would post this on using minimum water to grow crops. You do not need to use any soil just compost and logs etc. I have a friend who has long beds like this:

Untitled_large.jpg


He has made them half a meter deep and from waste materials. He only uses organic material and has to top dress once a year. Something like 18 inches of new material.


The illustration I used above is from here: https://watersavergardens.com.au/collections/standard-height-garden-beds/products/jumbo-garden

He is using a wicking system. This might be needed in some areas but I feel not that many places.

info-graphic.png


Youtube:


https://www.youtube.com/watch?time_continue=2&v=rXWlRykun6Y


WaterSaverGardens
Published on Jan 10, 2014
This video is about Building A Wick Garden With A Watersaver Garden Ki


/////////////////////////////////////////////////////////////////////////
Youtube:

How To Hügelkultur AMAZING Grow Method For Raised Beds Vegetable Gardens - Organic & Cheap


https://www.youtube.com/watch?v=3O2qCQU7Cac


Self Sufficient Me
Published on Jul 23, 2017
This is how I build a Hugelkultur raised bed vegetable garden or in other words mound culture/hill culture whereby soil is mounded over logs, sticks, and other organic materials to create a superior growing area for fruit and vegetables

///////////////////////////////////////////////////////////////


A Complete Guide to Building a Hugelkultur Garden Bed


https://www.youtube.com/watch?v=yOXclTEYzWQ


Vegan Utopia Ecovillage
Published on Aug 29, 2017
In this video, produced and funded by Vegan Utopia Ecovillage (formerly Jesus Vegans Community,) Täs and Chase give instructions.

Tas Zink and Chase Jones of Biodesic Strategies teach about all aspects of Hugelkultur including sheet mulching, finding the right materials, designing, construction and planting of your hugelkultur raised bed.

The video was shot near Kingston, Arkansas at the Vegan Utopia Event Center. For more information about this blossoming ecovillage, www.VeganUtopiaEcovillage.com


/////////////////////////////////////////////////////////////////////////////////////////


1, 3 & 4 Year Old Hugelkultur Results | & Does Wood Deplete Nitrogen In The Soil?


https://www.youtube.com/watch?v=FDqV3VBT46Y


Plant Abundance
Published on Jun 12, 2016
In this video Dan from http://www.PlantAbundance.com shares with you some results after growing on hugelkultur for the past 4 years & answers the question, "Does the wood in hugelkultur deplete nitrogen in the soil"?


////////////////////////////////////////////////////////////////////////////
 
Last edited:

China Connection

TB Fanatic
Hügelkultur: Why You Should Build This Ultimate Raised Bed
June 19, 2018 by Lydia Noyes
This post may contain affiliate links. Read our Affiliate Disclosure here.

170305EdPhoto2.jpg


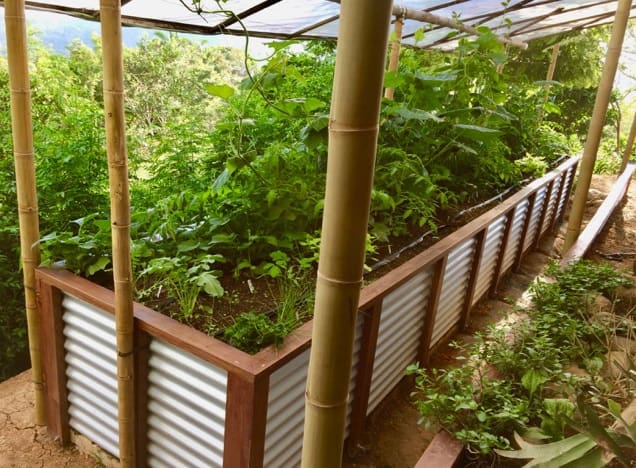
Erick Rifkin's raised bed design, based on the concept of hügelkultur. ((Courtesy of Ed Bernhardt and Erick Rifkin)


Hügelkultur: Why You Should Build This Ultimate Raised Bed

Are you looking for a gardening strategy that reduces your water requirements, provides long-term soil fertility, and is a self-sustaining system once you set it up? If so, it’s time to learn more about hügelkultur, a traditional German gardening solution that relies on wood piles to grow healthier plants.

Whether you’ve got a green thumb already or can barely keep a potted plant alive, hügelkultur has a lot to offer your backyard garden – if you are willing to take the time to set it up. Thankfully, the process is easier than you think.

What is Hügelkultur?

Roughly translating to “mound culture” in German, hügelkultur is a centuries-old gardening technique where logs are used as the base material for building mounded planting beds. The Austrian permaculture expert Sepp Holzer first popularized the process as a way to construct self-fertilizing garden systems that increase the available growing space while minimizing its fertilizer and irrigation needs.

This method is used predominately in permaculture systems, as it mimics the natural nutrient cycling process within a forest. Just as a forest floor builds up its fertility over time through layers of decomposing logs and detritus, hügelkultur beds are designed to be self-sustaining and regenerative for years, even decades after they are installed.
How Hügelkultur Works

They might look complicated, but hügelkultur beds are little more than massive compost piles built from decaying wood debris and other biomass. As fungi and bacteria break down this material over time, the logs and branches are transformed into a sponge-like growing medium that’s filled with air pockets which support consistent moisture levels and encourage robust root growth.

While hügelkultur is ideal in places with poor quality soil, soil compaction, or limited water resources, the beds can be used in any growing condition. While the mounds themselves might vary slightly depending on what’s available, the general idea is that the garden beds are built with large chunks of wood at the base, including tree trunks, branches, and brush. Compost and topsoil are then mounded overtop, creating a productive growing space for both annuals and perennials.

Benefits of Hugelkultur

Why should you go through the bother of setting up hügelkultur beds? In short, the services that they offer your vegetable garden are hard to pass up. Some of the benefits of hügelkultur beds include:

Retain moisture (even without irrigation) for weeks or months at a time
Sloped sides maximize planting space
Create natural air pockets for plant roots
Constant supply of organic material for plants
Self-tilling (soil shifts as the logs decompose)
Warms the soil through the natural composting process
Prevents excess nutrients from leaking into groundwater
Can produce fertile growing conditions without added fertilizer for over twenty years
Sequesters carbon into the soil to reduce greenhouse gasses
Ideal for desert conditions
Puts plant material to use that otherwise would be wasted
Easy to expand over time
Little weeding is usually necessary
Mounded beds make harvesting easier

How to Get Started with Hügelkultur

Convinced by the benefits of hügelkultur yet? Building a bed is easier than you think. Just follow these step-by-step instructions to get started.
1. Select Your Bed Site

When it comes to hügelkultur, one size does NOT fit all. Some people prefer to make huge hügelkultur beds that maximize the planting space, though it’s best to start small (6 feet by 3 feet is popular) for your first bed to ensure you have enough plant material to make it work.

Where you put your bed is just as important as its overall size. Some hugel beds are built east-west to take maximum advantage of microclimates over the course of the day, though a north-south orientation tends to allow for more light exposure for vegetable production.

When selecting a site, pay attention to water flow in the garden to see where water pools and drains. A hugel bed’s sponge-like nature can make them perfect for soaking up access water in naturally moist regions, but too much water will compromise the bed’s overall structure.

Another factor is whether you want to “bury” your bed. Some gardeners prefer to dig a trench to give their logs a better start at decomposing and reduce the overall height of the bed. However, this adds more effort to the construction process for relatively little benefit.

Finally, hugel beds will affect your yard’s airflow, so take into consideration the direction that dominate winds come from and whether any parts of your garden will benefit from a wind block. Likewise, any crops planted at the top will need to survive significant wind exposure, so orient the bed accordingly.
2. Gather Necessary Materials

Quality hugel beds require a stable foundation, so plan to collect as much woody material as possible before beginning. The “foundational” layer of the bed can be built with uncut logs, thick branches, untreated scrap lumber, and even whole trees.

Hardwoods are most suitable because they break down slowly and help the bed last longer and retain higher nutrient levels. Softwoods can also work, but they break down faster and will give you fewer seasons for planting. To maximize the benefits for your garden, start with a hardwood base and layer softwoods on top so that the bed includes a quick source of fertility that won’t deplete itself.

Best hügelkultur wood types: apple, aspen, maple, oak, poplar, birch, cottonwood.
Mediocre hügelkultur wood: cedar, juniper, (rotted) black cherry, eucalyptus, pine, red mulberry.
Worst hügelkultur wood: black locust, old growth redwood, black walnut.

Of note: all treated wood, including railroad ties, construction lumber, pallets, and anything painted or stained should be avoided.

Beyond wood, it’s also essential to acquire different sources of nitrogen-rich material for layering in the bed (manure or kitchen scraps work well), a straw mulch, and enough topsoil to cover it to a depth of 1 to 2 inches. Wood chips can be used in the middle layers, though they decompose quickly and don’t offer long-term fertility.

3. Place the Bottom Logs

You’re ready to begin building your bed once the log type and location have been determined. First, lay the largest logs down as a first layer in the bed. The trunks should be placed tight together to ensure the foundation keeps its shape as you stack layers on top.
4. Add Additional Layers

Next, add layers of thick branches to the logs, adding the material according to size so that the largest branches are on the bottom. You can then begin filling in the gaps with smaller branches to make it stable. Between layers of wood, incorporate several inches of “green” material like compost, kitchen scraps, manure, or grass clippings. This balances the nitrogen levels in the bed to better optimize it for vegetable production.

The wood-to-soil ratio depends on how fresh your wood is. Freshly cut timber requires more top dressing, while already-decomposing logs need less.
5. Water Layers in Well

Water down the layers as you build up your bed to jump start the decomposition process. To make things simpler, it’s also possible to let the logs set through several rainstorms before you build up the final layers of finer material.
6. Create Steeply Sloped Sides

While hugel beds can look any number of ways, steeper sides (close to 45 degrees) provide extra benefits like microclimates, warmer soil, better oxygenation, and less compaction over time. Nonetheless, you can form your bed into any shape you prefer, from gentle arcs to flat rectangles. Generally, beds that are several feet tall tend to work best over the long run.
7. Finish it Off with Top Soil

Once the bones of your hugel bed are in place, top it off with 1-2 inches of topsoil and a thick layer of mulch. The bed is complete!
8. Prepare for Planting

Though it’s possible to plant in hugel beds right away, most will benefit from “curing” for several months before you add your seedlings. Consider building a bed in the fall and letting it set throughout the winter before first planting it in the spring. When the time comes, you can plant seeds or transplants into the bed as you would any other garden bed, taking into consideration that the plants on the top have the most significant exposure to the elements.
9. Maintain the Bed Over Time

The beauty of hügelkultur is that well-prepared beds take little maintenance work beyond basic cosmetics. As the logs within the bed begin to break down, the structure might start to slump or sink down. Refrain from tilling or turning the bed, but rather top dress it with additional compost to retain their size and ensure the microorganism habitats stay robust.

Some people start with small beds and slowly build them up each year. You can aim for two and a half feet tall the first year and add approximately a foot each subsequent year to keep the size slowly growing as you offset its natural sinking.
Is Hügelkultur Right for You?

While hügelkultur is a stellar agricultural solution across the globe, it’s not right for every situation. You might want to reconsider investing your time setting up a hugel bed if any of the following circumstances sound like you.

You are part of a homeowners’ association with strict landscaping rules that prevent you from building mounds. Note: a submerged hugel bed might be a smart workaround.
You lack access to the large amounts of wood needed for building a bed.
You don’t want a permanent bed in your yard or prefer to start the garden fresh each spring.
You can’t commit to the manual labor needed to build it. While hugel beds are less work in the long run, they take significant effort to get established.
You have an exceptionally moist climate. Too much rainfall can make hugel beds perpetually wet and attract slugs, molds, and fungal diseases to your plants.
You aren’t comfortable with wildlife. Small critters like chipmunks and snakes often like to make hugel beds their home. While this is beneficial for your garden’s pest populations, some people find them to be a deterrent.

Regardless of whether you decide to set up a hügelkultur system in your garden, taking time to grow plants more sustainably is a benefit for both your health and the environment. For more advice on ways to make your garden amazing, check out these articles on how to set up a square foot garden system and ways to save money in your garden this year.


https://www.naturallivingideas.com/hugelkultur/
 

China Connection

TB Fanatic
I use Chicken Poo and a high-quality Hydroponic salt mix plus rock dust to feed what I grow. Minerals are minerals and a lack of them results in poor growth. Too much, on the other hand, drives worms out from the overfertilized area and can kill your plants. So it is a matter of not being too heavy handed when fertilizing.
 

China Connection

TB Fanatic
Mittleider Method

Now I use a good Hydroponic salt mix which is easier to use than the Mittleider salt mix and purer. I also add molasses to the mix to provide food for the bacteria in the soil.
.........................................................................................................

Not Organic

grow-box-gardening-garden-boxing-mittleider-method-grow-box-gardening.jpg


http://ziduu.com/blog/landscape-gardening/

While using commercial fertilizer is not part of the organic gardening method, the main concern most gardeners have is not using pesticides. The Mittleider method can be done without pesticides, using natural pest and disease control.

All of the mineral nutrients used in Mittleider fertilizer are natural and approved by the USDA for use in organic gardening. Plants cannot tell the difference between the nitrogen found in conventional fertilizer and the nitrogen in an organic fertilizer like compost or manure.

However, manufacturing conventional “chemical” fertilizers creates toxic waste products, uses non-renewable resources, and is energy intensive. This makes some people reluctant to go the conventional fertilizer route.

If you are not at all willing to purchase commercial fertilizer, this method can be adapted to use manure tea. There are books available from the Food for Everyone Foundation about gardening without fertilizers, but this is a more advanced variation of the method.


https://backyardville.com/mittleider-gardening-method/
 

China Connection

TB Fanatic
These next two Youtube will give you a clear picture of what you achieve by adding organic matter to the soil each year.


...................................................................................................................................


Youtube:


Amazing Garden Soil Transformation Using Wood Chips!


https://www.youtube.com/watch?v=YCtafUgoCX0


OYR Frugal & Sustainable Organic Gardening
Published on May 12, 2016
Wood chips have helped transform our soil from a rock hard mix of sand and clay to fertile productive soil.
 
Last edited:

China Connection

TB Fanatic
Charles Dowding's Incredibly Productive No Dig Market Garden (1/4 Acre)


https://www.youtube.com/watch?v=XCAAL1saPzM


HuwsNursery - Grow Organic Produce Inexpensively
Published on Aug 25, 2017
Charles Dowding's method of growing food is perhaps one of the most inspiring methods out there. He has developed his own style of no dig vegetable growing through his use of compost and the results really do speak for themselves. I decided to go and take a look at Homeacres to see what he is doing and to find out a bit more about no dig. I hope this video will inspire you to find out more, and these links will be useful for that:

/////////////////////////////////////////////////////////////////////////////////////////////////////////

Garden myths that take our time


https://www.youtube.com/watch?v=_WDk0U0oLa0


Charles Dowding
Published on Nov 8, 2016
I ask why its recommended to garden in ways that take longer, or using methods that give less harvests. An introduction to my book which looks at 99 myths. Filmed and edited by Edward Dowding https://edowding.net while Gardening Myths and Misconceptions is available at http://www.charlesdowding.co.uk/produ...
 
Last edited:

packyderms_wife

Neither here nor there.
I think there's a thread here on this topic I started a little over a year ago, here in the Gardening forum. With the weather getting screwier and screwier these techniques are going to become very important to the home gardener.
 

Cardinal

Chickministrator
_______________
Thanks for resurrecting this topic CC. I was actually thinking about this topic a few weeks ago. I need to get something going here.
 

China Connection

TB Fanatic
Adding Structure

tall and narrow hugelkultur with volunteer potatoes and round wood timber framing


https://www.youtube.com/watch?v=5dK-K0OVrkY


paul wheaton
Published on Aug 6, 2018
Paul takes the viewer on a walking tour around the basecamp hugelkultur bed and explains why it was necessary to build a mound that was very tall and narrow to accommodate the space they had. Paul points out potatoes growing on the bed that were probably originally part of their kitchen scraps composted into the mound.

Paul shows the "siege ladder" scaffolding that they are building onto the mound to allow access to the upper portion of the bed. The visual tour continues showcasing various other types of plant life are growing on the bed with no irrigation. Paul points out asparagus, rhubarb, "Sepp Holzer Grain", comfrey , strawberries and fruit trees, including peach trees!

A bit about angle of repose. Hugelkultur should have really steep sides, and this is done by having a lot of criss-cross wood on the inside providing structural integrity.

A peach tree started from a peach pit.

This is a solution to a property that is solid rock next to a road. zero soil leads to zero garden. The desire to "delete the road" begs for a tall berm. But since the location is a narrow shelf carved out of rock means that the berm (or hugelkultur) will be narrow.

Sepp Holzer wants hugelkultur to have steep sides.

Since this is generally unirrigated, then the plants go through a "bootcamp" where they either make it through the summer or they don't. Only the plants that can make it are kept.

Asparagus is still getting started. Lots of volunteer potatoes, lambs quarters, sepp holzer grain.

Comfrey as mulch; strawberries are ripe;

Thanks to Eric "The Mad Farmer" Tolbert for the description. http://tinysustainablelife.com

Relevant:

https://www.permies.com/t/89308/podca...
https://richsoil.com/hugelkultur/
https://permies.com/t/17/Paul-Wheaton...
https://permies.com/f/117/hugelkultur
https://permies.com/t/12206/Hugelkult...
https://permies.com/t/3904/grow-tomat...


berms and big hugelkultur plus a quick dry stack retaining wall


https://www.youtube.com/watch?v=jXtr07F1nig


paul wheaton
Published on Jul 31, 2018
https://permies.com Paul describes plants that are volunteering on the some of the berms and hugel beds at Wheaton Labs, including baby rhubarb, potatoes, alfalfa, peas and sunchoke (Jerusalem artichoke). Paul discusses a dry stack wall that he and Jocelyn put up in just a few hours that will probably last for decades.

The berm that Paul is showcasing is approximately three years old and this year is really starting to explode with vegetation. Paul is convinced that a feral cat that has taken up residence in the area is helping to keep the rodent population down so that the vegetables can thrive. Excess vegetation on the berm that is not helpful or wanted is used to promote soil growth in areas around the labs via the "chop and drop" method.

Thanks to Eric "The Mad Farmer" Tolbert for the description. http://tinysustainablelife.com

Relevant:

https://www.permies.com/t/89308/podca...
https://richsoil.com/hugelkultur/
https://permies.com/t/17/Paul-Wheaton...
https://permies.com/f/117/hugelkultur
https://permies.com/t/12206/Hugelkult...
https://permies.com/t/3904/grow-tomat...
 

China Connection

TB Fanatic
This Youtube is interesting as the lady says that a two-foot-high hugelkultur will hold water for roughly two months but that a six-foot hugelkultur will hold water up to a full year. She also says that by digging a trench 5 foot deep and filling with wood that after a couple of years the need for watering will be eliminated.


https://www.youtube.com/watch?v=ZHAbOD0SheE


Hugelkultur- The ultimate raised garden bed by Kelly Karaba
 
Last edited:

China Connection

TB Fanatic
Hugelkultur In The Fair Harvest Garden

IMG_3955.jpg


Two years ago we decided to experiment with Hugelkutur, a form of raised garden beds using rotting timber to create a mound of organic matter, air pockets and soil life.


IMG_2642-225x300.jpg


The reasons we were interested in Hugelkultur gardening :

We need to create growing areas that require minimal water as we have very long dry summers.


We have an abundance of fallen timber that needs to be dealt with and in our region with it’s Mediterranean climate, fallen timber and branches means fire hazard and we would much prefer to be sinking excess carbon into the soil than burning it into the atmosphere.


We need to build up soil life in our garden.


We used predominately eucalyptus and chose anything from small sticks to branches or small logs of about 15cm diameter. We did choose wood that had been fallen for a while and had started decomposing , this also meant we got some great fungal activity for free.

We made our Hugelkultur bed in winter while everything was quite wet, it is important to activate the soil life, so if your material is dry it would be advisable to soak it or water it down well as you go.
How we built the Hugelkultur Bed…
We started by digging a shallow ditch (around 30 cm deep) and placing the soil to the side.


IMG_3953-224x300.jpg


Then filling the ditch with wood, green material, seaweed and worm castings.


IMG_3955-224x300.jpg


When the pile had grown to about 60cm above ground the soil (and some compost )went back over the top.


IMG_3963-224x300.jpg


The whole bed was mulched with straw and we threw broad bean seed in as a green manure crop (it was winter so broad beans were an easy option to get activity happening.


IMG_3964-224x300.jpg


As weather warmed up enough to get summer veg in we planted with zucchini, melon’s and pumpkins.


Here’s where the interesting stuff started to happen. At first these plants were slow, and given it was in an area of the garden that doesn’t have any irrigation we wondered if the exercise was going to work at all. Once the plants got their roots down deep enough to be in contact with the rotting timber they really started to grow and required no water.


IMG_2642-225x300.jpg


IMG_2640-225x300.jpg


Given the success of the first bed we couldn’t help but moving onto bigger and better and created a new bed in our netted orchard area.

One small change we made with the new bed is that we didn’t make the mound as high as we felt that the wind factor on the first bed did have an impact on plant health.

The hugelkultur bed grew one of the most fantastic crop of beetroot I have ever known and now (about to enter it’s third year) is producing abundant sweet potatoes. We also had a great tomato crop

IMG_6042-225x300.jpg


IMG_6041-225x300.jpg


A few hints…
The beds do shrink over time so it is not advisable to create them where you want a permanent mound (like a swale).


IMG_8049-225x300.jpg


Large gaps and holes can appear where timber has completely rotted, creating good hideouts for reptiles.


img_8027


continued below
 

China Connection

TB Fanatic
Plant crops that can get their root down deep enough to access the nutrients in the rotting timbers
You may need to add extra nitrogen if there is a large amount of carbon to break down as the nitrogen will go to carbon break down instead of feeding your veg.
Be aware of building too high as wind can dry out the bed a lot.
While this is a great method to sink carbon and build soil it is not a quick and easy answer, we were very grateful for our amazingly enthusiastic WWOOFers that were staying with us as there is considerable heavy work involved.
Do not use any timbers that have been treated with chemicals and check on the many Hugelkultur blogs/discussions if you are concerned about the timber choice you are using.
Many people advise keeping Hugelkultur beds a good few metres away from any timber structures to avoid termite damage.
To finish with …here’s a couple of photos I took yesterday at our 3 year old bed…


IMG_8033-300x225.jpg


IMG_8028-225x300.jpg


If time permits we will be building more in the coming season.

If you would like to learn more about our gardens please contact us for a farm tour, come along to a Thursday lunch and explore the gardens or Join us for an Weekend Introduction to Permaculture or even better a two week live in Permaculture Design Certificate

happy gardening


https://www.fairharvest.com.au/hugelkultur-fair-harvest-garden/
 

China Connection

TB Fanatic
The Many Benefits of Hugelkultur
Inspiration Green and Permaculture magazine
Thursday, 17th October 2013
Hugelkultur are no-dig raised beds with a difference. They hold moisture, build fertility, maximise surface volume and are great spaces for growing fruit, vegetables and herbs.

Hugelkultur, pronounced Hoo-gul-culture, means hill culture or hill mound.

Instead of putting branches, leaves and grass clippings in bags by the curbside for the bin men... build a hugel bed. Simply mound logs, branches, leaves, grass clippings, straw, cardboard, petroleum-free newspaper, manure, compost or whatever other biomass you have available, top with soil and plant your veggies.

The advantages of a hugel bed are many, including:

The gradual decay of wood is a consistent source of long-term nutrients for the plants. A large bed might give out a constant supply of nutrients for 20 years (or even longer if you use only hardwoods). The composting wood also generates heat which should extend the growing season.

Soil aeration increases as those branches and logs break down... meaning the bed will be no till, long term.

The logs and branches act like a sponge. Rainwater is stored and then released during drier times. Actually you may never need to water your hugel bed again after the first year (except during long term droughts).

Sequester carbon into the soil.

On a sod lawn Sepp Holzer (hugelkultur expert) recommends cutting out the sod, digging a one foot deep trench and filling the trench with logs and branches. Then cover the logs with the upside down turf. On top of the turf add grass clippings, seaweed, compost, aged manure, straw, green leaves, mulch, etc...

10%20hugel.jpg

Pallets used around periphery

From 'Sepp Holzer's Permaculture'

Sepp Holzer recommends steep hugel beds to avoid compaction from increased pressure over time. Steep beds mean more surface area in your garden for plants and the height makes easy harvesting. The greater the mass, the greater the water-retention benefits.

Hugel bed dug in clay with logs put in vertically, next branches and lots of wood chips. Top 6" will be wood chips and dirt. This bed will store water and give nutrients for many years to come.

Straw bale gardens require less soil, less water and hold heat. As the straw breaks down nutrients feed the plants. Combining a straw surround with a hugel interior, topped by lasagne layering is an excellent idea for an area with poor quality soil.

Hugel bed in Ontario, Canada (June 28) by Tim Burrows. Tim surrounded his very tall hugel bed in pallets!


Sheet mulching (lasagne gardening) is like composting in place. Above: just a suggestion as to sheet mulching layers. Nitrogen-rich material such as fresh grass clippings or green leaves put right on the hugelkultur wood would help jump start the composting process. Could also include seaweed, straw, dead leaves, leaf mould, etc...

The first year of break down means the wood (and fungi) steal a lot of the nitrogen out of the surrounding environment, so adding nitrogen during the first year or planting crops that add nitrogen to the soil (like legumes) or planting species with minimal nitrogen requirements is necessary, unless there is plenty of organic material on top of the wood. After the wood absorbs nitrogen to its fill, the wood will start to break down and start to give nitrogen back in the process. In the end you will be left with a beautiful bed of nutrient rich soil.

Tree types that work well in hugelkultur:

Hardwoods break down slowly and therefore your hugel bed will last longer, hold water for more years and add nutrients for more years. But softwoods are acceptable as well, a softwood bed will just disintegrate quicker. Mixing woods with softwoods and branches on top, to give off nutrients first, and hardwoods on bottom, sounds like a plan if you have access to multiple types of wood. Yet the newly decomposing softwoods at top will eat up a lot of nitrogen at first, so compensate for that.

Woods that work best:
Alders, apple, aspen, birch, cottonwood, maple, oak, poplar, willow (make sure it is dead or it will sprout).

Trees types that work okay:
Black cherry (use only rotted), camphor wood (well aged), cedar/juniper/yew (anti-microbial/anti-fungal, so use only at very bottom or unless already well aged. Cedar should be broken down before new plant roots reach it), eucalyptus (slightly anti-microbial), osage orange (exceptionally resistant to decay), Pacific yew (exceptionally resistant to decay), pine/fir/spruce (tannins and sap), red mulberry (exceptionally resistant to decay).

Tree types to avoid:
Black locust (will not decompose), black walnut (juglone toxin), old growth redwood (heartwood will not decompose and redwood compost can prevent seed germination).

This article was cross-posted from www.inspirationgreen.com/hugelkultur.html


https://www.permaculture.co.uk/articles/many-benefits-hugelkultur
 

China Connection

TB Fanatic
Where to Get Round Raised Garden Steel Galvanised Beds


CulvertPlanter2.jpg


About 20 minutes long.


https://www.youtube.com/watch?v=K4GqucMYzg4


Self Sufficient Me
Published on Nov 30, 2017
I get a lot of people asking me where can I get these steel raised garden beds from so I decided to make this video and to answer the question.

General raised bed gardens on Amazon: https://bit.ly/2AmpGyM

Raised beds on eBay Australia: https://bit.ly/2AlgDxZ


......................................................................................................................................


CulvertPlanter1.jpg


A couple of months ago I dreamed up these planters. Thankfully, I have an awesome husband who can whip this sort of stuff up for me. I posted some pictures on Twitter and Facebook (and I'll be posting some on my new Instagram account too!) of my garden and people wanted to know more about the raised planters I'm using.


So, here is what they look like. I've got five of them made out of leftover culverts we owned and weren't using. Culverts are big drainage pipes that are used underground to carry water. Now, I'm sure not everyone has these just laying around, but you can check Craigslist and find them or call around and see if your city has any they want to get rid of. Otherwise, check with a plumbing supply house (not a Lowe's or Home Depot).


Here is what you will need:

Culverts (mine are 48" wide and 4' tall)
1 garden hose
1 roll of thin metal wire
Drill with 3/8" drill bit (or similar)
Razor knife
Level
Circular saw/sawzall/plasma cutter (one of the three)
Paint (if you're using a galvanized pipe, you'll need to make sure you have paint that will stick to galvanized metal)
Creek or clean gravel - enough to fill up half of your culvert
Garden grade dirt - enough to fill up the rest of your culverts


Directions:

1.) Measure and mark your culverts for cutting.

2. Cut your culverts to length using a circular saw with a metal blade, a sawzall or a plasma cutter if you have one.

3.) Paint the culvert. Let dry completely.

4.) Using your knife, cut a slit through one side of the garden hose (not all the way through it - it should remain in one piece) so that it will wrap around the top of the culvert (see picture below).

5.) Place garden hose on top of the pipe as shown below.

6.) Drill a hole right below the garden hose every 10-12".

7.) Thread metal wire around garden hose, through the hole you just drilled and tighten (shown below).

8.) Set your culvert in place and make sure it is level, side to side and front to back.

9.) Fill your culvert halfway with gravel. ***If you're only using these to grow shallow plants, like herbs, you can use more gravel and less dirt which will be less expensive. ***

10.) Fill remainder of the culvert with garden dirt leaving about 4" of space at the top.

11.) Plant your garden!


Here is one of my planters - this one has potatoes and onions! These planters are GREAT for anything that will grow down into the dirt like carrots, onions, garlic, potatoes, turnips etc.

Let me know if you have any questions!
 

China Connection

TB Fanatic
Welcome to Birdies! Home of Modular Raised Garden Beds & Garden Sheds
Growing Vegetables is easy with Birdies Garden Products!


Who are we?

“Made By A Gardener For The Gardener”

We are Australia’s leading & original manufacturer of raised garden beds and their associated products. Our passion for gardening and sustainability is evident in all aspects of our product range and we pride ourselves on providing quality, easy to use and innovative products for the end user.

Birdies Products are perfect for growing a variety of plants weather that be growing veggies in the backyard or for a rooftop garden in a city.


design-180907-1-1.png


Deepetched_6in1slategrey-e1517533783953.png


https://birdiesgardenproducts.com.au/
 

China Connection

TB Fanatic

How we Grow a Massive Garden and RARELY Have to Water!


https://www.youtube.com/watch?v=RUZfourw_zw


MIgardener | Simple Organic Gardening & Sustainable Living
Published on Jul 7, 2016
The garden is made up of around 3,000 square feet of growable space and
believe it or not we rarely water. Even when days get into the 90's the
beds stay damp and the rain and underground moisture is enough to
fulfil the water requirements of the entire garden. This is truly hands
free gardening at its finest. This method is ideal for those with
expensive water, a lack of water, or those wanting to just be more self
sufficient and ecological.
Send mail to:
PO box 131
Marysville, MI 48040


////////////////////////////////////////////////////////////////


How to Set Up Core Garden Bed - Core Gardening Method


https://www.youtube.com/watch?v=iTnBlkG7h98


MIgardener | Simple Organic Gardening & Sustainable Living
Published on Sep 29, 2016
In this episode I will show you how to set up a core garden bed using
the core gardening method. It is easy, fast, and truly a great way to
grow a garden!


///////////////////////////////////////////////////////////////////////////////////////////////////


Experimenting With Gardening: The Core Method

By seanealy in Gardening on February 18, 2017


core2.jpg


We’ve started putting in raised garden boxes, where a lot of our cold weather crops will be grown, with a transition into summer crops, and I wanted to quickly share the gardening technique we’re experimenting with this year. It’s called the Core Method, and its not necessarily a new technique. But this is the first year we’ve used it in our own garden.

The method is simple. The idea is to incorporate organic material down the core, or center, of your raised bed before planting. As this material breaks down it will release vital nutrients to your plants while enriching the soil and raising the moisture retention ability in your soil bed. Most of the time this is done with rotted straw, but we’re using rotted grass clippings and mulched leaves.

core1

We have this great space in front of the old brick barn, nestled on the southern side of the hog shed, where the ground is relatively flat. This picture was taken yesterday late afternoon, but we get at least 8 hours of direct sunlight here, and the hog shed provides decent wind break. Our plan is to put in nine raised beds this year, and to incorporate some flowers throughout the space to attract those necessary pollinators.

core5

Once the box is built and placed, I’m laying cardboard on the bottom, right over the grass. This allows me to not have to dig the grass up (its warm but the ground is still frozen 4 inches below the topsoil) or lay down plastic. I want my plants to have access to the rich soil below and for their roots to not be restricted to the depth of the box (16 inches). The cardboard will kill the grass and act as a weed barrier as it breaks down over time.

core6

After the cardboard is placed and soaked really good, I’m putting down a thin layer of mulched leaves from our fall pile. Then I’m placing the rotted grass clippings right down the middle of the bed in clumps about six inches deep. The grass is rotting but still green, so it should be a nice source of nitrogen for my spring crop.

Many people use straw instead of grass clippings. I don’t have access to straw without going out and buying it, so I’m using what I have readily available. The important thing to remember is that whether you use straw or grass, it should be partially rotted already. Don’t use it if its wet and slimy, as this will work against the balance you’re trying to create in the soil (think composting; same principle), and could contribute to plant disease or hinder growth. You don’t want to use fresh straw either, as you might not see the benefit of it breaking down until the following year. Using material that is already in the process of breaking down will give your plants a continued source of nutrients throughout the season. Just make sure you don’t use material that has been sprayed with a herbicide, or grass that has gone to seed! (I wouldn’t use hay either, as most hay has seed in it and will create unnecessary weeding.)

core7

After the grass clippings are placed, I’m adding native soil from the property. Our soil here is a rich blend of sandy clay and I want to use it as much as possible. We had a new septic tank put in last summer, and after the leech field was excavated we ended up with a large pile of black earth. This is what I’m using to fill our boxes.

core3core2

I’m starting at the sides and spreading the native soil throughout the box. I’ll cover the grass and mulched leaves and then follow with a layer of compost, which we’re having trucked in from a local business within the week. Once I add compost, I’ll mix in more native soil. Then I’ll be ready to plant.

Remember, good soil is the key to growing healthy plants! Building up the organic matter in your garden soil will attract worms (that’s why we don’t put landscape fabric underneath our raised beds), improve soil structure and as the grass breaks down it will create a beautiful humus.

By the way, you don’t need to have raised beds to incorporate the Core Gardening Method. If you already have or are establishing raised beds on the ground, whether permanent or annual, you can use this method to enrich your soil. This is a neat and organic way to let nature do the work for you, and works well on a no-till garden plot!


https://theoldbrickbarn.com/2017/02/18/experimenting-with-gardening-the-core-method/
 
Last edited:

China Connection

TB Fanatic
How to Grow a lot of Food in a Small Garden - 9 EZ tips


About ten minutes long:


https://www.youtube.com/watch?v=Bc4ecvD_rMM


How to Grow a lot of Food in a Small Garden - 9 EZ tips

OYR Frugal & Sustainable Organic Gardening
Published on Jul 17, 2014


1) Grow in Beds, not Rows
2) Optimize Spacing between Beds and Plants
3) Grow Vertically
4) Succession Planting
5) Interplanting
6) Grow in the Shade
7) Grow Edible Plants in the Front Yard
8) Grow Microgreens
9) Grow in Pots & Containers

Ideas from viewers

1) Interplant sweet peas with sunchokes. The sweet peas fix nitrogen, the sunchokes act as trellises for the peas, and both attract beneficial insects.
2) 3 sisters garden
3) Grow dwarf trees and plant shade tolerant crops underneath
4) Grow in window boxes
5) Optimize use of space by growing food you like the most

OYR is all about growing a lot of food on a little land using sustainable organic methods, while keeping costs and labor at a minimum. Emphasis is placed on improving soil quality with compost, mulch, and compost tea. No store-bought fertilizers, soil amendments, pesticides, compost activators, etc. are used.

Featured Videos:

Growing Food in Partial Shade: http://youtu.be/jNsE****SQY

How to Build a Keyhole Raised Bed Garden:
http://youtu.be/EXl48VNEe9Y
 

China Connection

TB Fanatic
Square Foot Gardening (SFG): Growing More in Less Space

About 15 minutes long

https://www.youtube.com/watch?v=f2FxJimob84


Square Foot Gardening (SFG): Growing More in Less Space

Published on Mar 14, 2014
If you don't have a lot of time available to weed, water and maintain your vegetable garden, then efficient gardening techniques such as Square Foot Gardening could be the answer.

With simple and well-defined instructions, Square Foot Gardening is a great way to start growing your own food quickly, and with excellent results.

In this video, we introduce the thinking behind Square Foot Gardening and explain everything you need to know to setup your own SFG garden beds including the best soil mix, plant spacing, positioning, companion planting and supporting structures to use.

If you've noticed any pests or beneficial insects in your garden recently please report them via http://bigbughunt.com

If you love growing your own food, why not take a look at our online Garden Planner which is available from several major websites and seed suppliers:
http://www.GrowVeg.com
http://gardenplanner.motherearthnews.com
http://gardenplanner.almanac.com
and many more...


////////////////////////////////////////////////////////////


Square Foot Gardening


About 20 minutes long

https://www.youtube.com/watch?v=AZbHZO_tUiU


Quickcrop
Published on May 24, 2014
In this video we show you how to get the most from your raised bed by using this simple square foot gardening technique. This works on a variety of beds all available, which you can look at here at
https://www.quickcrop.co.uk/page/rais... in this video we're using a 6X3 raised bed.

Square foot gardening is designed in mind for you to take advantage of smaller spaces by maximising your crop output. Why only grow one cabbage when you could grow 16 carrots. This video shows you how to set up a raised bed in simple steps and gives an idea of how much to plant and the prime planting positions for you. For more information on square foot gardening as well as more videos check out our websites https://www.quickcrop.co.uk/ and
https://www.quickcrop.ie and don't be afraid to like and subscribe to us here for more informative videos.

More info on Raised beds: https://www.quickcrop.co.uk/blog/rais...


////////////////////////////////////////////


Square Foot Vegetable Gardening - Part two


About 20 minutes long

https://www.youtube.com/watch?v=yeVF8J75xUg


Quickcrop
Published on May 26, 2015
How to plant your own urban garden using the Quickcrop Square Foot Vegetable Gardening method. Square foot gardening is all about taking advantage of smaller spaces and raised garden beds to maximise your crop output. This is typically done by dividing the raised bed into square sections 12 inches per side using gardening twine or timber laths to achieve a grid system. The aim is to assist beginner vegetable gardeners and also help create the highest yielding garden possible.

https://www.quickcrop.co.uk/square-fo...
https://www.quickcrop.ie/square-foot-...
 

20Gauge

TB Fanatic
We use the sq ft gardening method. Granted some adaptation is needed as we are in SE Georgia, but it is working very well for what we are doing. Here it is October and we are still harvesting enough peppers to actually give some away.

I still need to install another 3 planters this next year. So far we have only 2.
 

China Connection

TB Fanatic
I am in the process of setting up seven large raised beds at the moment. I have the raised beds but have to enclose them due to all the animals that are about. Had 5 wallabies last night plus possums visiting.


B1T3KB-wallaby_3387942b.jpg


Brushtail+Possum+David+Cook.jpg
 
Top