Red composting worms should be part of every preppers stash. Worms produce an incredible "soil amendment" (fertilizers have to go through some government process). Be able to reliably produce your own fertilizer and recycle wastes just makes common sense. And, if you raise baby animals it is a fast and easy way to compost the bodies if the bin is deep enough.
I have a can-o-worms which lived in my kitchen for a couple of years with no odor. I think they have it set up so the worms migrate up to the highest level for food. Worms don't like to migrate up. They like to go down and a light on the top layer will facilitate the process . Just keep that in mind when you set up the bin. Perfect for a family.
We also have a worm wigwam which is 3 foot diameter. This is the one I compost the dead animals in and is the workhorse.
I keep three tanks of gerbils to chew and soil newspaper for worm bedding. Food consists of old animal feed, kitchen scraps, weeds, and dead baby animals. You will hear cautions about composting meat but that is ridiculous. Nature uses composting worms just for that purpose. The trick is to make the bin inaccessible to prowling animals.
You can also just make a bin from a ventilated plastic storage tub. If you collect the worms pick them from decaying leaves. The larger garden worm does not domesticate and will escape.
There is lots of information on the net for composting redworms. We have had them for almost a decade and I find them fascinating and very useful.
On another note, we joke about storing valuables in mason jars and burying them in the worm bins. NO ONE is going to go looking there.
Happy worming.
The Roto-Gerbil Worm composting system- one of my inventions using biological systems (1997)
Gerbils as Urban Livestock
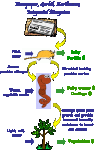
A home-based integrated recycling system
As organic farming rapidly grows in Europe and is starting to accelerate in the US, citizens are becoming more aware of the ecology of farming-the interaction of the soil, fertilizers, plants, and animals-as an single, integrated system. For the average homeowner, this concept of environmental responsibility often only means collecting newspapers, cans, and bottles to bring to the local recycling depot with the luckiest ones having home pick-up. Unfortunately, driving one’s car a few miles to recycle small quantities of recyclables is not environmentally responsible. The only true way to practice home ecology is to recycle where the trash was made.
This system of utilizing gerbils and worms to turn newspaper and kitchen trash into the highest quality fertilizer is still in its infancy. It will take many people innovating and sharing their ideas to develop a simple, efficient way to recycle in the home. The concept is so simple-for a few cents of seeds and alfalfa newspaper can be transformed into valuable earthworms and castings worth 100’s of times the value of the gerbil food-with little or no extra work than gerbil owners are already doing!
What started as a joke has become a realistic way to incorporate gerbils into my organic farm by just letting the gerbils do what they LOVE to do-chew! People think of gerbils as pets, energetic entertainers with a few annoying habits we have to learn to accommodate. What if their habits could be harnessed to supply a renewable and recyclable resource? They can be, and we envision common home colonies of dozens of gerbils hired-literally employed to work for food-producing a resource that help to turn a typical home and garden into a more environmentally responsible place. It could also be called small-scale permaculture.
Permaculture is a planned system of agriculture where all the plants and animals are integrated to fill a niche, supplying nutrients or energy to make the system work smoothly and simply with little adding human or petroleum energy. In the true spirit of permaculture, one creature's natural habits and waste products are employed to fill the need's) of another species. Biodynamic farming integrates animals to fertilize crops that in turn provide food for people and the animals.
We are using gerbils as a home-scale biodynamic farm with newspaper as the soil and earthworms and their castings as the crop. In this case, we are utilizing the natural behavior of gerbils to shred waste newspaper which is then fed to composting earthworms. In the process of making their own bedding, their urine and manure add the necessary nitrogen to bring the carbon-nitrogen ratio of the paper into a better balance to feed the earthworms. Earthworm castings are considered the most valuable soil amendment available. Earthworms thrive in newspaper bedding and vegetable scrap food, producing fine quality castings in 30 days instead of the 240 days required be conventional composting methods. Earthworms also have the ability to detoxify their nutrient substrate as it passes through their bodies, so the castings are sought for organic fertilizer commanding $0.25-$1.00 US per pound. The odorless castings are an incredible soil amendment for gardens, tress or house plants, speeding germination of seeds, growth of the plants, and increasing the vigor of the plants. Plants raised in 15% castings are very resistant to insect and diseases. Castings have been shown to lower levels of disease-causing bacteria. Earthworms are an important part of organic or biodynamic gardening or can provide a nice source of hobby income on a small scale.
This started as a joke
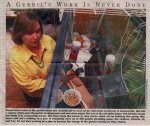
In our early days of worm farming we were on an e-mail worm-farming list. One of the common complaints was how messy and troublesome shredding paper was by hand or through a garden shredder. Our single attempt at using the chipper shredder filed the garage with bits of paper. My son had been given two gerbils and we dutifully supplied the creatures with paper towel rolls to chew. On a lark, we threw in a pizza box to see how they would handle such a large item. The gerbils, of course, loved it, making a wonderful nest out of the shredded cardboard. We went back to the e-mail list to ask if all rodents were like this or were the gerbils special. As in any large list, there were enough folks with various pets to provide interesting data. Although not at all scientific, after two weeks the consensus was the rabbits chewed a little, the hamsters and mice chewed until they made a nest they liked, and the gerbils were manic chewers. One of the list British list members dubbed the system “Roto-Gerbil” and an ecologically sound method of shredding paper was born!
Actually, as we continue with this project with our current population of about 50 gerbils, it is clearly a much more efficient way of keeping gerbils as pets. We let them make their own bedding, removing it bi-weekly or so when it is about 7-10 inches deep or when it has an odor usually caused by a leaking water bottle. Some gerbils are better shredders than others and have their preferences. Napkins, paper towels, brown paper bags, paper egg cartons, newspaper, and cereal boxes are the preferred paper products. The heavier cardboards separate the motivated chewers from the ones that just make bedding.**The bottom line is that the gerbils are very happy.**
Gerbils as subterranean animals
The subterranean nature of the gerbils is much more evident with these deep beds. The waterers, the food, their lives go underground. Like miniature prairie dogs, they pop out of their burrows and stand sentry. The behavior of the gerbils in this setting is far different than the gerbil pets in the shallow bedding we are accustomed to. Also, a 10 gallon tank can accommodate 8-10 gerbils without crowding-there is simply more cubic feet for them to live in. When it comes time to clean the tank, we replace it with a supply of crumpled whole newspapers after removing the toxic colored magazine supplements and advertisements. They chew and tunnel frantically. On the down side, it is much more difficult to keep them fed since the food is buried. Whole corn cobs are in the tanks all the time to make sure there is something to eat. It is not their first choice, so when the kernels are eaten, it is a sure sign we need to feed them. This is an excellent classroom exercise, but children MUST wash their hands after playing in the newspaper.*
Getting the paper ready for the worms
The paper has urine and feces, so we clean the tank while wearing rubber gloves, a good precaution when cleaning any animal's tank. To protect the worms from the decomposition of ammonia, the paper has to go through a quick composting so the initial heat does not kill the worms. Put the paper in a shallow bin and wet thoroughly. It can also be mixed with and old feed from other ruminant (plant-eating) farm animals, but it is not necessary. The mass will heat up over the next week, sometimes as high as 130 degrees. We add it to the worm bin when it has cooled down to 80 degrees. In the meantime, the heat is available to use. The composting will slow down if too much heat is drawn off through an imbedded pipe, but if a covered tub is used, it can provide bottom heat for seedlings without slowing the decomposition process.* Household worm bins are fed vegetable scraps and eggshells that would otherwise be composted. Instead of the composting process taking months it takes only a few weeks.*
How I got started and how not to do it
We originally set up a 55 gallon aquarium with a grating replacing the solid bottom. 18 gerbils were introduced. The intention was for the paper shreds to fall through to bins underneath. After about two weeks of this arrangement we concluded that gerbils DO NOT like to be suspended in the air. We had two separate gerbil families separated by grating. Even within the family groups there was serious fighting. They pretty much docked each other's tails until we installed aluminum trays under the grates allowing the paper shreds to accumulate and provide bedding and hiding places. Now we hand empty the tanks as needed every week or two. The gerbils aren't manic and they all have their long tails. A 10 gallon aquarium can house 10 gerbils with sufficient newspaper.
Where do we go from here? As a livestock farmer, I see the need for larger or more automatic waterers, and larger self-feeders so cage cleaning, feeding and watering can happen simultaneously. Feeding the gerbil farm will more closely resemble farm animal feeding. I feed my gerbil farm from alfalfa bales, whole corn cobs, and bird seed supplemented with rabbit pellets, all very cost effective since they are purchased at the feed store instead of the pet store. We do offer seasonal fruits and vegetable from the garden.
This easy system works and is a tremendous amount of discovery fun while producing a high quality product. I encourage gerbil owners to try this home-based integrated biosystem for themselves.

")