Compost Composting worms in the mountains?

ShadowMan

Designated Grumpy Old Fart
We live in the Southern California mountains above 5600 feet and have been thinking about adding composting worms to our gardening efforts. I'm wondering what sort of a set up we would need and how the worms would fair in the mountain winters here. We're officially in ZONE 8a or 9a depending on what book you read. Not looking to sell worms or anything like that, and our soil here, as far as I've seen has no worms in it. Now we do have gophers, moles, voles and such, or so I've been told. Our soil is a mix of BIG FRIGGEN ROCKS, decomposing limestone and granite.

My biggest question is how well and which worms can winter over in our high cold climate. What sort of worm composting beds would work best in this situation. Any suggested reading material on Vermiculture you'd recommend?

THANKS
 

Publius

TB Fanatic
Find someone with horses and ask if you can dig into the manurer pile for worms and maybe they will even allow you have a few truck loads of it as a bonus just for asking. Any worms you find in a manurer pile in your area will do just fine in your garden.
 

China Connection

TB Fanatic
PREPARE YOUR WORM BIN FOR WINTER IN 5 EASY STEPS
DECEMBER 2014FRANCESCA4 COMMENTS

Prepare Your Worm Bin For Winter In 5 Easy Steps

FILED UNDERTAKING CARE OF YOUR WORM FAMILY

Worms are one of Mother Nature’s original recyclers. For millions of years they’ve been hard at work turning organic material into nutrients for the soil. And if you’re a gardener, chances are you have a few hundred working in your own worm bin, churning your table scraps into mineral-rich compost. But what happens to your wigglers during the winter months? Normally, worms prefer to spend the winter deep underground where it’s nice and warm. That means your best bet for keeping your worms productive (and alive) during the cold season is to make sure the bin is properly insulated to retain heat. To help you prepare your bin for the cold weather, we at Squirm Firm put our heads together to come up with the best ways to keep your worm bin at the proper temperatures:
1. Pack In Extra Insulation
Add insulation to your bin to help it retain heat better during the icy months. Try spreading vacuum cleaner bags, old socks, blankets, sheep’s wool, or pieces of carpeting on top the bin to form a protective layer from the cold. If it’s still early on in the season, you can start adding a few of these every few weeks for the worms to disperse throughout the bin. Don’t forget, insulating the outside of your bin can be just as important as the inside. We’ve heard of gardeners covering their bins with everything from hay barrels to tarps to cow manure. Whatever you use, don’t pile it up too much or else your worms will have trouble getting sufficient air and moisture.
  • Squirm Tip: Fall leaves aren’t just pretty for looking at – they can also provide a crucial heat source to help your worms weather the winter. Make the most of your foliage by filling your bin with large amounts of leaves and other yard waste.
2. Place Your Worm Bin Next to Heating Vents
Chances are if you’re reading this, you live in a place where you’ll be trying as hard as your worms to stay warm this winter. One of our favorite tricks for keeping temperatures up is storing the bin next to the external exhaust vent of our heating system. That way when the heater is on (which is often!) the bins are absorbing heat from the air discharged outside. Not only do you get to reuse some of that hot air you’re paying for, you also get to take the edge off those bitter cold nights for your worms.
3. Go Floorless
It’s generally a good idea to make your outdoor worm bins floorless so that your worms can burrow into the earth when needed to stay warm. Being able to wriggle down to safety during cold snaps and extreme temperatures is crucial for your worms’ survivability during the harsher months. We recommend either purchasing a floorless bin or cutting the floor out of whatever container you’re using to keep your worms in. Remember: even a full and well-insulated worm bin can seem colder to a worm than a few inches of solid earth.
  • Squirm Tip: For even more heat retention, try digging a hole in the shape of your worm bin in the ground and then placing your bin inside it. The hole can be anywhere between two inches deep and half the height of your worm bin. We recommend lining the hole with a thin layer of plastic material before packing your bin in to help prevent moisture from getting inside.
4. Install a Heater
If you’re the sort of worm parent who likes to make sure your babies have the best of everything, you might consider buying or building a worm heater. These usually incorporate the same heating coils you’d use to warm seed trays inside a greenhouse, except that you place them on top of your worm bin. Warming mats and even electric blankets can also make good alternatives, although we recommend you pick something with a built-in thermostat to prevent you from having to run out during a blizzard to turn it on.
5. Go Easy on the Food Servings
Once the temperatures begin to drop, you’ll start to notice that the worms aren’t producing compost quite as fast as they used to. Like a lot of insects, worms naturally slow down their metabolism during the colder months to help conserve energy – but so long as your worm bin is kept nice and warm, those little mouths will expect to be fed. To maximize your compost production during the winter, feed your worms smaller portions of food which has already been broken down in a blender or food processor. That way, your worms’ digestion won’t have to work so hard to convert your food scraps into rich compost.
Follow these steps and your worms will be busy producing compost well into the winter. Don’t forget: Mother Nature has been taking care of her worms for a very long time. If conditions get too cold, your worms’ biological clock will kick in, causing them to reproduce in a hurry to make sure their DNA is carried on to the next generation. While this may be sad for the worms, it means that you’ll have a new batch ready to churn out fresh, high-quality compost for your garden in the spring.
Here at the Squirm Firm, we take serious interest in sharing our passion for worm composting with the world. If you know others who could use this information, please join us in our mission by sharing it on your favorite social networks. Thanks
 

China Connection

TB Fanatic
Worm Composting In Winter & Cold Weather
Guides to Making Worm Compost
“Winter is quickly approaching and I’m wondering what I need to do to get my worms through the winter. I have a small outside worm bin made out of cinder blocks with an earth floor. It is buried about one foot deep. Do I need to add extra bedding? Do the worms hibernate? Do I feed them all winter?” ~ Doris Stevens
Worm Composting
You’re right, Christmas is coming, temperatures are dropping and in some places it will be snowing! This makes it very timely for going through some basic things to do to keep your wormery working and your worms healthy (and alive!)
Worms Hibernate
Many people ask: What do worms do during the winter to stay alive? The answer is that most of them hibernate. Earthworms are cold blooded i.e. they cannot regulate their body temperature like we can. So their body temperature is directly affected by their environment.
As the surrounding temperature drops, so will their body temperature. When this happens, their body processes will start processing at a slower rate, which makes they more ‘sluggish’. The worms will move about slower, eat slower and create worm cast slower.
When the temperatures reaches down to near freezing point things can get so slow that it seems the worms do not move at all. This is when they hibernate to conserve energy and to stay alive.
Freezing Kills Most Compost Worms
Some species of earthworms can tolerate some degree of freezing (0°C and under) which is called the freezing point tolerance. However most of the earthworms used for composting do not have a freezing point tolerance and will die once their environment has reached 0°C.
This is because a massive proportion of the earthworm is water. When water freezes it expands in size and forms ice crystals. When the whole worm undergoes this freezing change, the crystals can destroy the inner workings and the cells of the worm causing irreparable damage.
In nature most earthworms hibernate by creating a small burrow pocket.
The pocket will have enough oxygen for the worm to survive in the winter. The worm will then curl itself up into a ball and secrete mucus to surround it. This mucus lowers the freezing point so that the worm is protected from freezing easily.
Some worms (such as the Lumbricus Terrestris) do not hibernate. They create deeper burrows where temperatures are warmer due to the insulation from the surrounding soil.
The good news about freezing temperatures is that worm cocoons can easily survive freezing points. So even if the earthworms are wiped out through a harsh winter, the cocoons ensure that their worm populations can carry on.
As a worm farm owner, you don’t want your beds to reach freezing point. If you use your beds to recycle organic waste you don’t want the temperatures to be dipping so much that they can’t process food either. Fortunately there are some tricks to keep your worm beds insulated and warm. But bear in mind that the composting rate WILL be slower.
Keeping Your Wormery Productive in Winter
First of all, if you have a small wormery that can be easily moved, it will save you a lot of effort by moving it into a more sheltered area such as your garage. The following techniques can still be used if your location does go through some tough temperatures.
Insulation is a great economical way to keep your worm bed warm. There are a few ways and materials which you can use to do this.
First of all the soil in your garden and snow (if your area generates a lot of snow) are great FREE insulating materials.
These materials are fluffy by nature and contain millions of small pockets of air which helps trap heat in. By simply digging and burying your wormery in the ground or snow, the wormery can be protected from the harsher temperatures outside. Instead of burying it, you can also surround your bin with some insulation material such as polystyrene (if you have some waste lying about), thick carpet or even a clear plastic covering (which not only traps heat, but creates a greenhouse effect).
Within the wormery, the upper surface can be protected by adding a thick layer of straw, hay, grass or even dry leaves. These materials are great as it again creates pocketfuls of air. With straw and grass, they may even generate a small amount of heat in the right conditions.
Some people have gone further and purchased electric heaters to help raise temperatures of the worm bin.
These can be easily bought from aquarium shops where the heaters are used to heat ponds and aquariums. These are mostly a metal rod which heat up and are relatively inexpensive. They can keep certain areas of your wormery warm, although for a larger wormery system, more than one rod will be needed.
Heating rods usually range in temperatures of 23 – 35°C. But it may be easier to just turn them up to its maximum and stick the rod through the centre of the wormery. This will prevent the centre and the surrounding areas from freezing.
The worms will also adjust their own position to find the spot most comfortable for them. If the area is too hot, the worms will move further away from the rod. This most important thing is not to let the area freeze. With the centre being the warmest point and being the place less likely to freeze, the worms will start to gather around that area.
It will be best to feed around the area of the heat rods since this is where the wormery will be most active. If done correctly, you may even be able to keep the rates up as they were in autumn!
The last thing is a technique that I came across on the net. I can’t vouch for this technique but it seems like a very viable technique which may just work.
Geothermal thermal heating.
This technique brings air through pipes which are buried in the ground under the wormery. It then utilizes the natural insulated ground to warm up this air, which is then passed through the wormery system.
It sounds like an expensive process, but the technique shown on this webpage is actually very inexpensive and only requires a few drain pipes which can be easily purchased from most hardware stores.
The following link will bring you to the page, which explains in more detail the process of geothermal. It links you to a page to teach you how to build it! Winter temperature control for worm composting (or vermicomposting)

Allotment Growing UK has been granted exclusive & sole permission to republish the above article for the benefit of it’s visitors who are interested in composting with worms. Originally published in the excellent free worm composting newsletter – Worm Farming Secrets


China Connection

TB Fanatic
Vermicomposting: A smart winter compost option
Vermicomposting is a good way to compost during winter months when your outdoor compost pile is dormant.

Terry Gibb, Michigan State University Extension - December 12, 2014

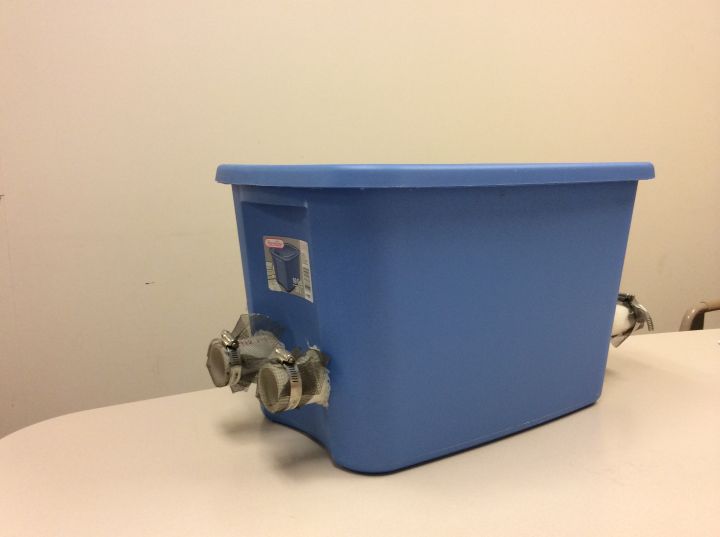
Homemade worm bin using inexpensive materials
Many people let their compost piles go dormant during the winter months rather than continue to work the pile with little or no new yard material available. However, that does present a problem for composters who compost food waste in their pile.
Vermicomposting, a.k.a. worm composting, is a good alternative for food waste. Worm composting recycles food waste into a rich, dark soil amendment just like you get from your compost pile.
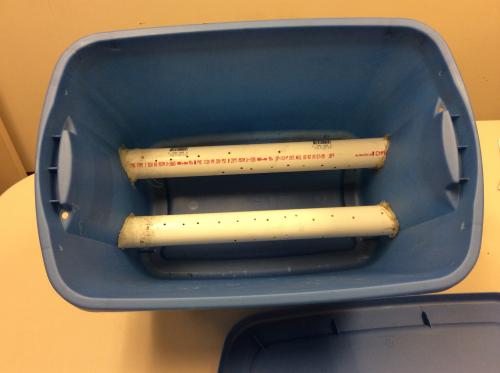
The Michigan State University Extension Master Composter Program describes vermicomposting as a simple process in which you make a bin using a plastic storage container half-filled with shredded paper (newspaper is best). The bin has one or two perforated PVC pipes running thought it to ensure sufficient oxygen. Small quantities of broken up, soft food are buried daily starting in one corner and working around to each corner and the center and then repeating.
The optimal bin is a 10-14 gallon lidded, plastic storage container. Once you’ve made the bin (you also can purchase worm bins and even worm condos!), the worms do all the work. It’s important to use the right type of worms. Regular garden worms do not work in a compost bin. The best type of worm is called Eisenia fetida or Red Wiggler. Red wigglers are available at fishing or bait stores or ordered online. If you have friends that are vermicomposting, they probably have plenty of worms and would share some with you. Eight red wigglers can produce 1500 new worms in six months if bin conditions are correct! Correct bin condition include:
  • Temperature range of 55 to 77 degrees Fahrenheit.
  • Moist environment – begging should be 65 to 75 percent moisture but no standing water or puddles
  • Bin must remain aerobic (with oxygen)
  • Neutral pH range of 7 – but worms can tolerate a range from 4.2 to 8 or higher
The worms will eat almost anything including fruit and vegetable scraps, bread and grain products, tea bags, coffee grounds and filters and non-greasy foods. Worms cannot decompose meat, bones, fat, dairy products, greasy foods or non-food items (plastic, rubber bands, aluminum foil, Styrofoam, etc).
Inside worm bin

This shows the size and spacing for air holes in the PVC pipe inside the worm bin.
Worms will eat half their weight in food every day. So the more worms you cultivate, the more food waste you can compost. Worms prefer the food to be in small pieces and soft (cooked). They are able to process it easier and faster.
If you discover the worms are dying or not thriving in your bin, some things to check are:
  • Is there enough food available for the amount of worms in the bin?
  • Is the bedding too dry or too wet?
  • Is the bin too hot or too cold? It’s best not to store the bin in an unheated garage during winter.
  • Is the bedding sufficient? Or has it been eaten and needs replacing?
  • Has your worm population grown too large and needs to be divided into another bin?
There are several advantages to worm composting:
  • The process requires very little work once the bin is established
  • There are no odors with the process. People have been known to store their bin in the kitchen or basement
  • Soil conditioner that is produced is beneficial to plants
  • Vermicomposting is easy to do for apartment or condo residents and seniors or physically challenged
  • This process can be done year round but is especially handy during winter months
A good reference book on worm composting is “Worms Eat My Garbage” by Mary Appelhof. If your local library does not have a copy, search “worms eat my garbage” for purchase locations.
Other sites for vermicomposting information are Cornell University’s Cornell Waste Management Institute and New York State Department of Environmental Conservation.

This article was published by Michigan State University Extension. For more information, visit https://extension.msu.edu. To have a digest of information delivered straight to your email inbox, visit https://extension.msu.edu/newsletters. To contact an expert in your area, visit https://extension.msu.edu/experts, or call 888-MSUE4MI (888-678-3464).
 

China Connection

TB Fanatic
You will probably have some type of local worm but they will not be big eaters or breeders. Your common manure worm needs lots of food but breeds up quick once things heat up.
 

IRoberge

Veteran Member
We keep our compost worm bin in the kitchen. No one knows they are there and they consume some of the table scraps.
 

lonestar09

Veteran Member
Another approach that has worked well for me is sheet composting, I guess you would call it. I gather up all the bags of leaves in the neighborhood around me and dump them in the garden yearly. Around me ash leaves in the fall and oak leaves in the spring. You do have a risk doing this. There is a possibility of peoe using fertilizer or weed killer and the leaves picking it up and then composting in the garden. So far it has not been a problem for me as I can tell. I have had more issues with the mulch from the city. There is a fair amount of trash in it. I had gotten several trailer loads of it and on the next to last load took a 5 gallon bucket back to them full of trash and let them throw it away. I complaines about it to them but it probably didn't do much good. The leaves work good, in my opinion and most people put them in nice contractor trash bags that can be reused. If you have questions let me know or if you are licky enough check and see if you have a city or county Forrester. I remember the firrester had a program a few years ago about using leaves in your yard. I am currently getting ready to do a hugelkultur mound some place in the yard, since my son will get to do a lot of tree trimming soon. He doesn't know that yet but he is going to have so much fun!!
 
Top